

1. Why an Eyedropper?
For the past two weeks, I’ve been working on an augmented reality assistant for traditional painting; a project that fuses my passions for oil painting and XR. At some point, I needed a way to sample exact colors from my physical palette and bring them into the AR glasses. On desktop, this is handled by the eyedropper, a tool that lets you read a color at a specific point on screen. I wanted to see how this interaction might translate to AR, so I built one in Lens Studio for the 2024 Spectacles.
2. Implementation
The color data is read from the user’s camera feed. Because this feed is quite large, and I was planning to sample a single pixel from it, I needed to crop it down. Fortunately, the Spectacles Samples provide a project that implements a cropping functionality that I reused here.
After the first cropping interaction, an individual pixel might still be too small to be made out by the user. To tackle this issue, I took inspiration from Figma’s eyedropper UI, I implemented a menu containing:
- a magnified view of a sampled area covered with a grid which represents the pixel samples.
- an indicator of the sampled pixel’s color.
Both update in real-time, as the user hovers on the crop area’s surface.
3. UI and Materials
The recently released Spectacles UI Kit took care of many of the key UI elements. This allowed me to focus my attention on bespoke materials for rectangle corners and grids. My prior 3D development experience involves lots of Three.js, where you’ll usually write shaders inline with JavaScript or TypeScript code. As a result, when using Lens Studio I find myself leaning towards writing shader code rather than wrangling material graph nodes. For this reason, I’ve prioritized the use of The Material Graph Editor’s Custom Code Nodes.
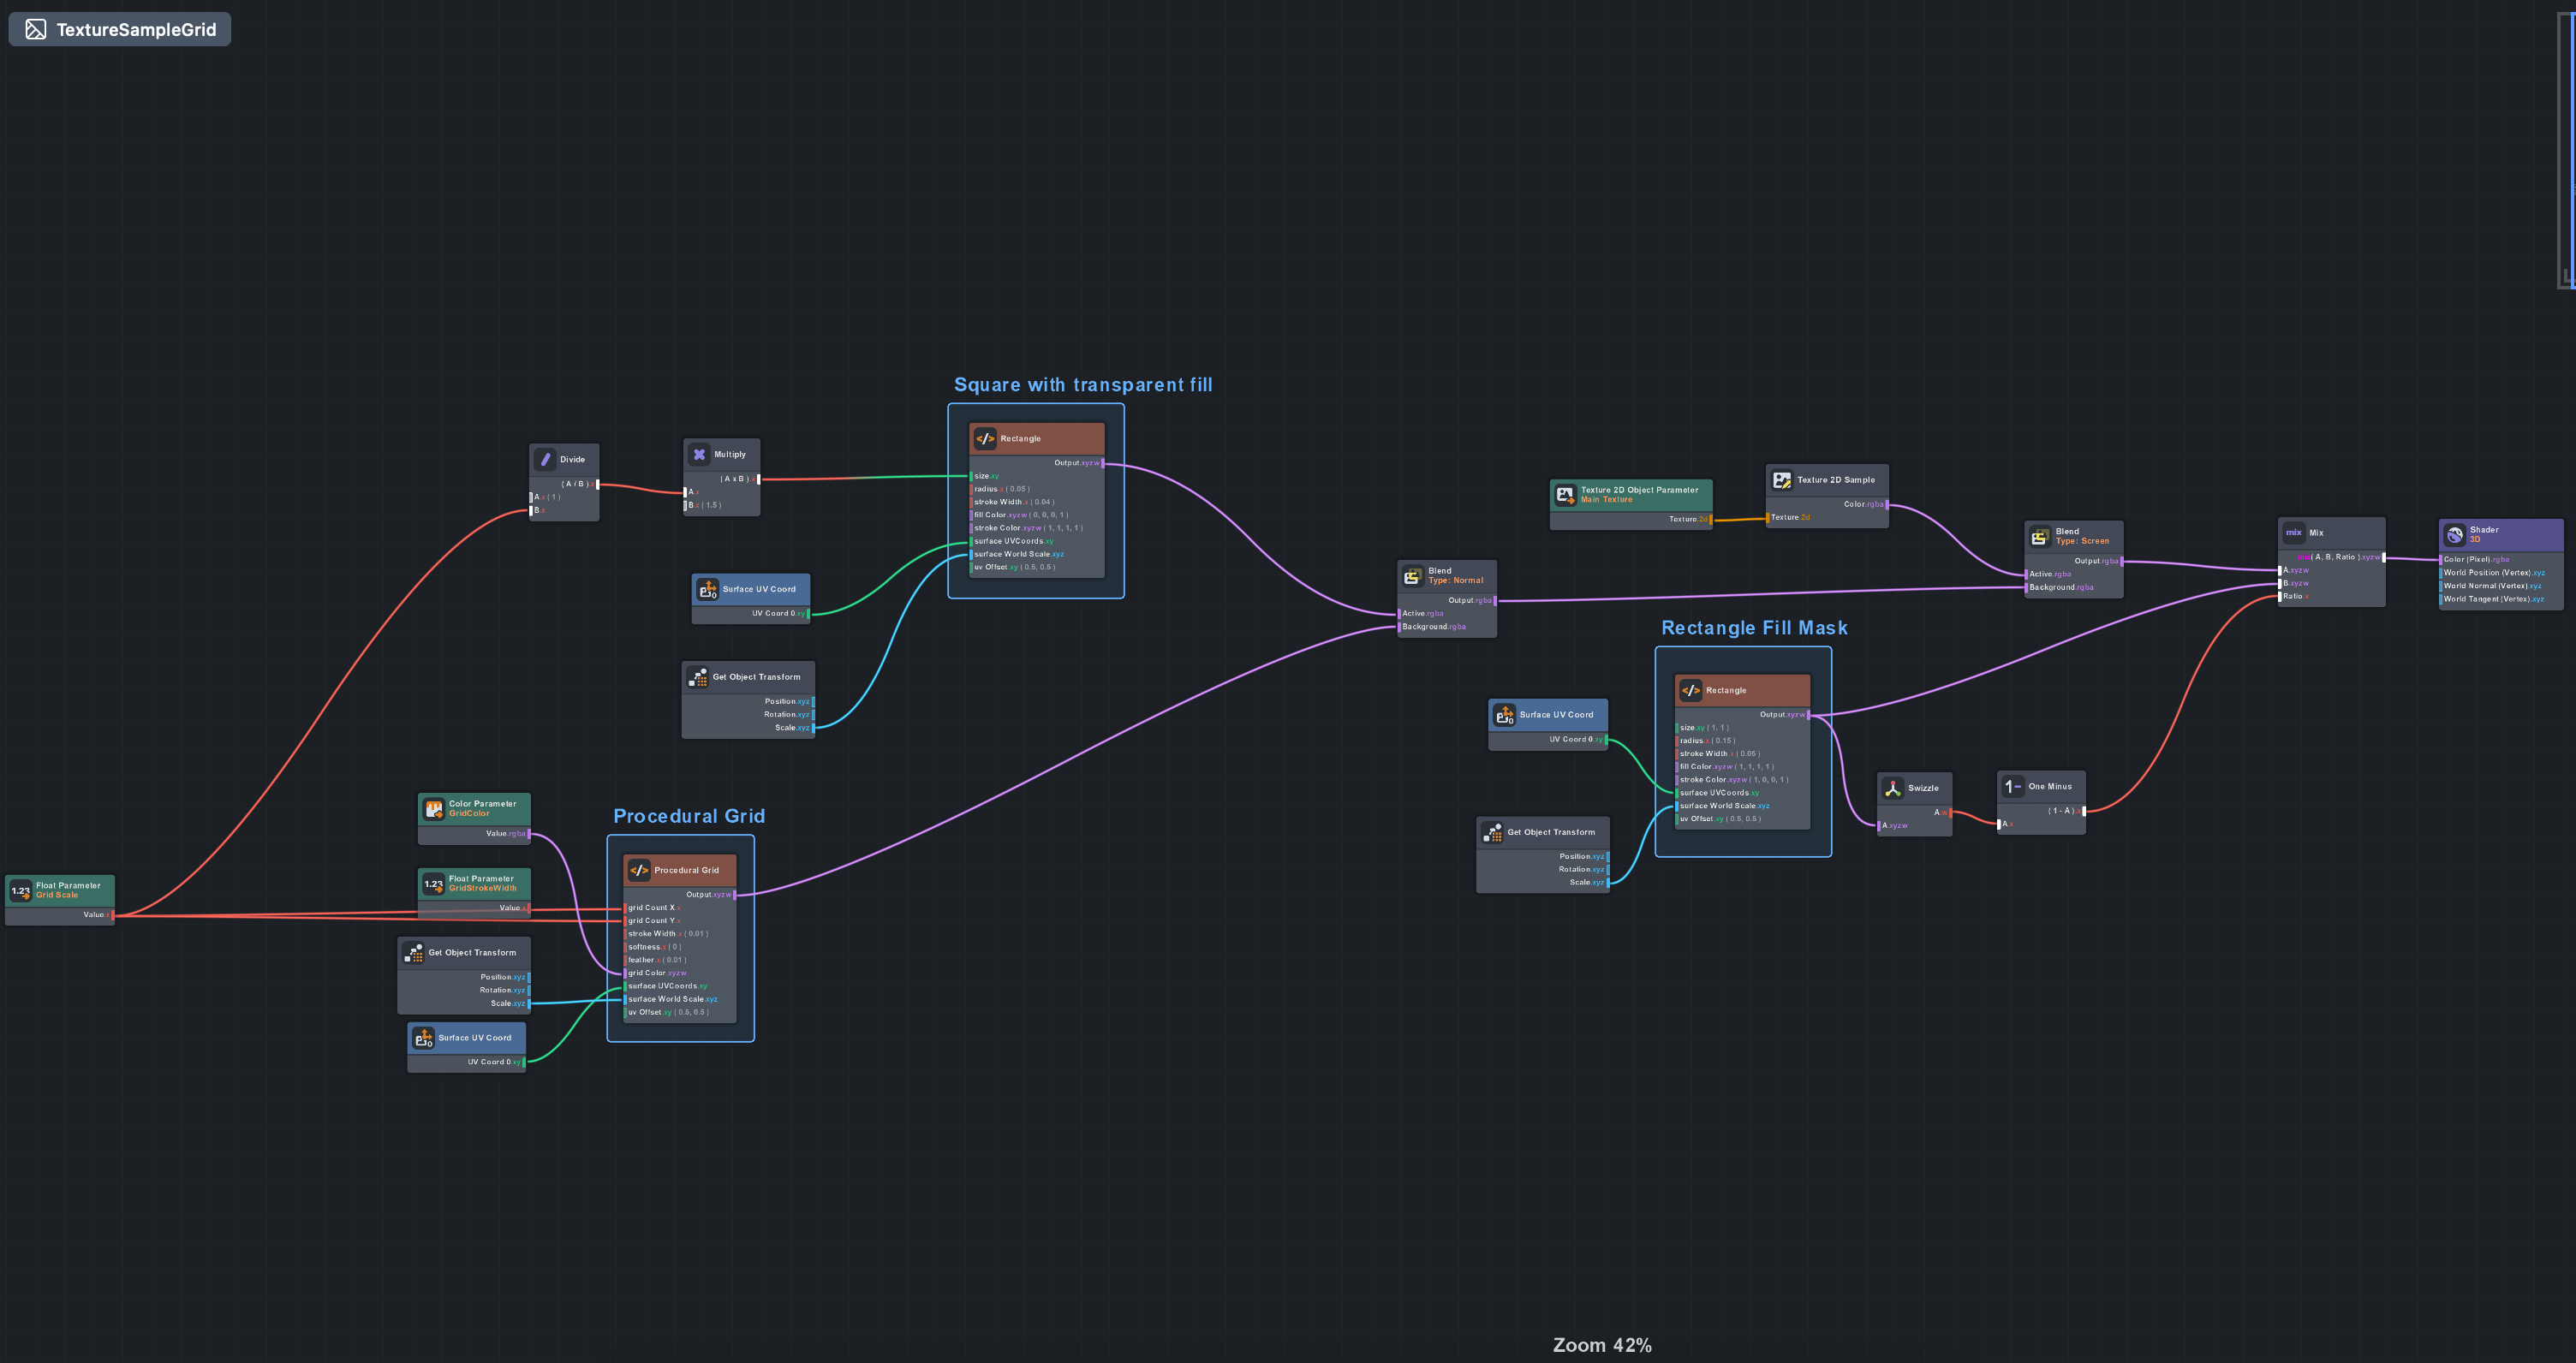
Below is a screenshot of the Procedural Grid’s Material Graph and a snippet of shader code.
The logic for reading and displaying colors is handled by a CropAreaSelector class. I’ve included some of its core methods below; they showcase ProceduralTextureProvider and getPixels(), which are useful for reading and writing pixel data to textures.
4. Security Considerations
Note that the getPixels API is restricted when using the Remote Service Module. As a result, it might prompt a user authorization screen when launching the lens.
This initially perplexed me: you can send camera textures to a remote server but you can’t read pixel values locally? The rationale, as best I can understand it is that if you can read pixels locally, you could extract sensitive information (Credit Card data, facial recognition, etc.) and exfiltrate it through innocuous-looking API calls without the user’s knowledge. By restricting local pixel access when remote services are enabled, Snap ensures that if any image analysis happens, either:
- it stays entirely on-device (no remote module), or
- the user is explicitly warned that data is leaving the device (remote module triggers authorization prompt)
5. Comfort and ease of use
When testing the Eyedropper on Spectacles, I noticed that mid-air and fine-grained movements don’t really go hand in hand. Something I’ve taken for granted from desktop use is that tactile interaction, where the user applies pressure on a surface, results in a tangent friction force. This friction force stabilizes their hand trajectories, both in position and speed.
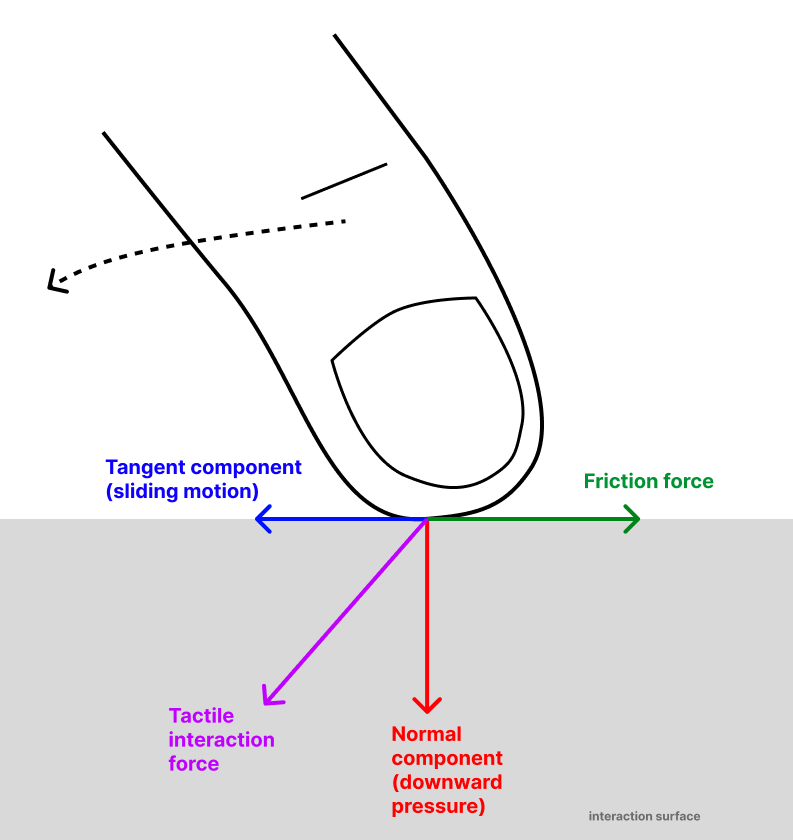
It is precisely this trajectory stabilization which enables finer-grained movement. This is not something that can be reproduced through filtering, because filtering causes spatial information loss. Friction on the other hand guides movement towards more stable dynamics without causing information loss.
Upon observing this, I felt tempted to drop physical interaction in favor of the most convenient user experience of all: querying a multimodal AI model.
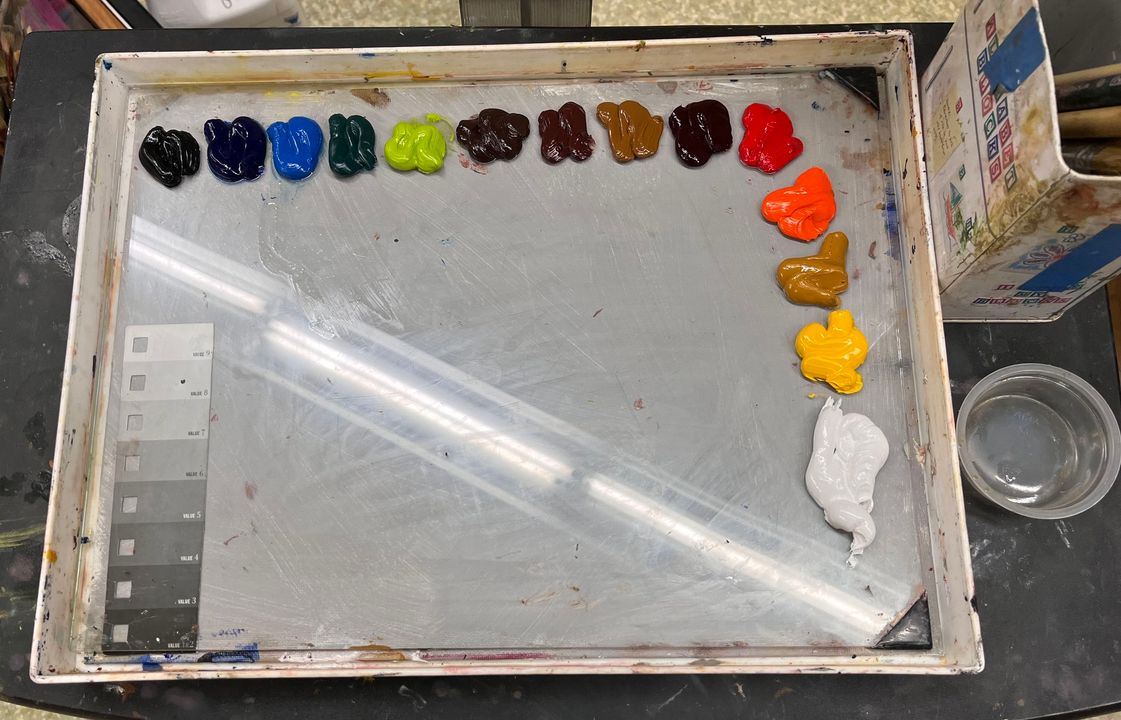
I called a Gemini model to segment palette color blobs and extract pigments from each. Then I actually didn’t bother segmenting and simply sent the entire image to a Gemini model and the results were equivalent.
This would’ve been unthinkable 5 years ago, but because tech evolves at an exponential pace, 5 years is actually… kind of an eternity.
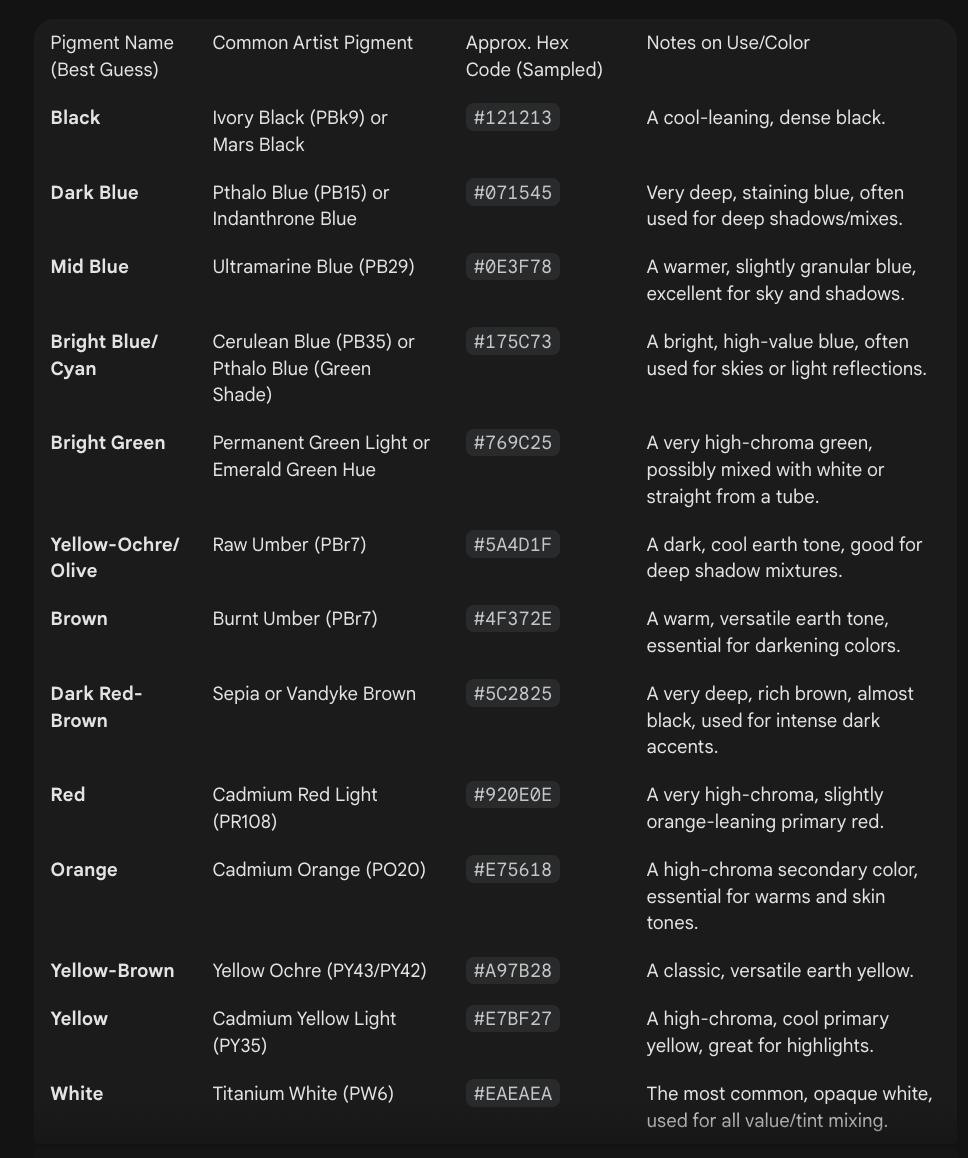
Now, though the extracted pigments aren’t necessarily found in the input image, it provides enough perceptual accuracy for the user to accomplish their goal. After all, the domain we’re tackling is traditional painting and not professional color grading.
In the end, I will make both interaction modes available for the user to choose:
- one that is deterministic and over which they have complete control.
- another that is probabilistic and where the user yields a lot of control.
6. Code Snippets and References
Procedural Grid Custom Code Node
input_float gridCountX;
input_float gridCountY;
input_float strokeWidth;
input_float softness;
input_float feather;
input_vec4 gridColor;
input_vec2 surfaceUVCoords;
input_vec3 surfaceWorldScale;
input_vec2 uvOffset;

output_vec4 Output;

void main()
{
    float aspect = surfaceWorldScale.x / surfaceWorldScale.y;

    vec2 p = surfaceUVCoords - uvOffset;
    vec2 pNorm = vec2(p.x, p.y / aspect);
    vec2 pShifted = pNorm + 0.5;

    float halfStroke = strokeWidth * 0.5;
    float gridMask = 0.0;

    for (float i = 1.0; i <= gridCountX - 1.0; i += 1.0) {
        float lineX = i / gridCountX;
        float distToLine = abs(pShifted.x - lineX);
        float lineMask = 1.0 - smoothstep(halfStroke - softness, halfStroke + softness + feather, distToLine);
        gridMask = max(gridMask, lineMask);
    }

    for (float j = 1.0; j <= gridCountY  - 1.0; j += 1.0) {
        float lineY = j / gridCountY;
        float distToLine = abs(pShifted.y - lineY);
        float lineMask = 1.0 - smoothstep(halfStroke - softness, halfStroke + softness + feather, distToLine);
        gridMask = max(gridMask, lineMask);
    }

    Output = gridColor * gridMask;
}
CropAreaSelector Methods
private updateCropArea(localPosition: vec2): void {
    if (!this.screenCropProvider || !this.cropAreaMaterial) {
        return;
    }

    const gridSize = this._validatedGridScale;
    const halfGrid = Math.floor(gridSize / 2);

    const centerPixel = this.localToPixelCoords(localPosition);
    const startPixel = this.clampCropRegion(centerPixel, gridSize, halfGrid);

    const croppedPixels = this.sampleCroppedPixels(startPixel, gridSize);
    this.updateCropAreaTexture(croppedPixels, gridSize);
    this.updateSelectedColor(croppedPixels, gridSize, halfGrid);
    this.resetSelectionToCenter();

    this._onCropAreaChangedEvent.invoke();
}

private localToPixelCoords(localPosition: vec2): vec2 {
    return new vec2(
        Math.round((localPosition.x + 0.5) * (this.screenCropWidth - 1)),
        Math.round((localPosition.y + 0.5) * (this.screenCropHeight - 1))
    );
}

private clampCropRegion(centerPixel: vec2, gridSize: number, halfGrid: number): vec2 {
    return new vec2(
        Math.max(0, Math.min(this.screenCropWidth - gridSize, centerPixel.x - halfGrid)),
        Math.max(0, Math.min(this.screenCropHeight - gridSize, centerPixel.y - halfGrid))
    );
}

private sampleCroppedPixels(startPixel: vec2, gridSize: number): Uint8Array {
    const pixelBuffer = new Uint8Array(gridSize * gridSize * 4);
    this.screenCropProvider.getPixels(
        startPixel.x,
        startPixel.y,
        gridSize,
        gridSize,
        pixelBuffer
    );
    return pixelBuffer;
}

private updateCropAreaTexture(croppedPixels: Uint8Array, gridSize: number): void {
    const cropAreaTexture = ProceduralTextureProvider.createWithFormat(
        gridSize,
        gridSize,
        TextureFormat.RGBA8Unorm
    );
    const texProvider = cropAreaTexture.control as ProceduralTextureProvider;
    texProvider.setPixels(0, 0, gridSize, gridSize, croppedPixels);

    this.cropAreaMaterial.mainTexture = cropAreaTexture;
}

private updateSelectedColor(croppedPixels: Uint8Array, gridSize: number, halfGrid: number): void {
    const centerPixelIndex = halfGrid * gridSize + halfGrid;
    const i = centerPixelIndex * 4;

    const color = new vec4(
        croppedPixels[i] * ONE_OVER_255,
        croppedPixels[i + 1] * ONE_OVER_255,
        croppedPixels[i + 2] * ONE_OVER_255,
        1.0
    );

    this.selectedColorMaterial.baseColor = color;
}